1. Purpose
The manual facilitates the understanding of the RoboCup Rescue Simulation server and helps people interested in participating in RoboCup Rescue Agent Simulation competitions.
2. Installation
This manual assumes the simulator will run in a Linux machine even though it is possible to run them in Microsoft Windows or Apple macOS. We recommend to use Linux because it is open-source and most of the distributions have a good support from the users' community. If you have never used Linux before and intend to, we recommend starting with a user-friendly distribution, such as Ubuntu or Fedora.
2.1. Software Requirements
-
Utilities like
wget,bash,xterm,tar,gzip, etc.
Note: If you are using Ubuntu, all of these utilities are present in the default software repositories.
2.2. Download
You can download the simulation server by cloning the https://github.com/roborescue/rcrs-server repository. Clone the simulator server using the command
git clone https://github.com/roborescue/rcrs-server.git2.3. Directories
The rcrs-server contains multiple directories. The important directories of the server are:
-
build/: compiled Java classes -
docker: configuration to run the simulation server in Docker -
docs/: documentation -
jars/: simulator JAR files -
lib/: external libraries -
logs/log: text log files -
logs/jlog/: JSON log files -
maps/: maps and scenarios -
modules/: simulator source code -
scripts: scripts to run the simulation server
2.4. Compiling
The simulation server has to be compiled on your machine to generate the required JAR files to run the simulator. Execute the steps below to compile the simulation server.
-
Change to the directory
rcrs-server-
If macOS, patch the file
scripts/functions.shusing command
sed -i -e "/readlink/s/^/#/" scripts/functions.sh
-
-
Compile the simulator using the command
./gradlew completeBuild -
Check the message at the end of the installation. If the installation is successfully completed, the message
BUILD SUCCESSFULis displayed; otherwiseBUILD FAILEDis displayed.
2.5. Example
In Ubuntu, the installation proceeds according to the following commands.
$ git clone https://github.com/roborescue/rcrs-server.git
$ cd rcrs-server
$ ./gradlew completeBuild
The following message will be displayed if the installation is successfully completed.
BUILD SUCCESSFUL in 2s
1 actionable task: 1 executed
3. Running
There are two modes of execution of the simulation server: Precomputation and Normal.
3.1. Precomputation Mode
In the precomputation mode, the simulator connects one agent of each type and allows them to write the computation results.
The sequence of commands to run the simulation server in precomputation mode are:
$ cd rcrs-server
$ cd boot
$ bash start-precompute.sh
After running the simulation server, run the agents. Once the precomputation is completed, push Control-C and type sh kill.sh to stop the simulation server of running.
Control-C
$ bash kill.sh
3.2. Normal Mode
In the normal mode, the simulator connects all agents defined in the scenario and allows them to use the precomputation output.
The sequence of commands to run the simulation server in normal mode are:
$ cd rcrs-server
$ cd boot
$ bash start-comprun.sh
After running the simulation server, run the agents. Once the simulation is completed, the server will stop automatically.
3.3. Parameter Options
The following parameters can be used to run the simulation server:
-
-m MAPDIRor--map MAPDIR, whereMAPDIRis the path to the directory containing the map you want to run (default is../maps/test/map). -
-c CONFIGDIRor--config CONFIGDIR, whereCONFIGDIRis the directory containing the configuration associated with a map (default is../maps/test/config). -
-l LOGDIRor--log LOGDIR, whereLOGDIRis the directory where the log files will be stored (default is../logs).
These parameters can be used at running a precomputaion and a normal simulation. You must use the same parameters for MAPDIR and CONFIGDIR to run a simulation server in precomputation and normal mode. An example of how to run the simulation server using these parameters is:
$ bash start-precompute.sh -m ../maps/kobe/map -l logs2
(After completing precomputation)
Control-C
$ bash kill.sh
$ bash start-comprun.sh -m ../maps/kobe/map -l logs2
4. Tools
The simulation server comes with several tools to support the development of new maps and scenarios as well as replaying of the simulation.
4.1. Map editor
Open a terminal window, navigate to the rcrs-server root directory and execute
$ ./gradlew gmlEditor --args=<map file path>where --args=<map file path> is optional.
For example,
$ ./gradlew gmlEditor

$ ./gradlew gmlEditor --args="../maps/gml/test/map"
4.2. Scenario Editor
Open a terminal window, navigate to the rcrs-server root directory and execute
$ ./gradlew scenarioEditor --args=<scenario path>where --args=<scenario path> is optional.
For example,
$ ./gradlew scenarioEditor
$ ./gradlew scenarioEditor --args="../maps/test/map"
4.3. Random Scenario
Open a terminal window, navigate to the rcrs-server root directory and execute
$ ./gradlew randomScenario --args=<map path>where --args=<map path> is optional.
For example,
$ ./gradlew randomScenario

$ ./gradlew randomScenario --args="../maps/test/map -civ 10 100 -fb 1 50 -fs 0 1 -pf 1 50 -po 0 1 -at 1 50 -ac 0 1 -refuge 1 2 -fire 0 1"
4.4. Log Viewer
Open a terminal window, navigate to the rcrs-server root directory and execute
$ ./gradlew logViewer --args='-c maps/test/config/logviewer.cfg <log path>'where --args='-c maps/test/config/logviewer.cfg <log path>' is optional and <log path> defines the log file path. The default log file path is logs/log/rescue.log.
4.5. osm2gml
Open a terminal window, navigate to the rcrs-server root directory and execute
$ ./gradlew osm2gml --args='<osm map path> <gml map path>'The <osm map path> is the path to the OSM map file and the <gml map path> is the destination GML map path.
5. Simulator Design
This section describes the simulator architecture and its main features as well as the entities composing a simulation scenario.
5.1. Architecture
The RoboCup Rescue Simulation server is composed of several simulators as listed in Table 1.
| Simulator | Description |
|---|---|
Clear |
Manage blockade removal |
Collapse |
Manage buildings' structural damage and blockade creation |
Ignition |
Randomly ignites fire on buildings during the simulation |
Fire |
Manage the fire spread between buildings and extinction |
Traffic |
Manage humans' movement |
Miscellaneous |
Manage human damage and buriedness |
These simulators establish connections to the kernel simulator, responsible for coordinating the simulators' processes and centralizing the data they generate (Skinner & Ramchurn, 2010). These connections are illustrated in Figure 1.
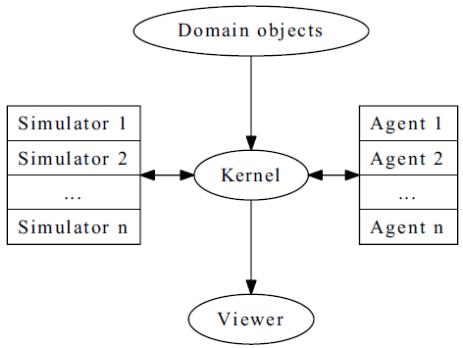
The RoboCup Rescue simulator was designed to create a partially observable, discrete-time, dynamic, stochastic, multiagent environment. In other words, in this environment:
-
the complete world current state cannot be known through a single agent’s perception (even if the agent has an infinite range of sight, it still will not be able to see through a building’s walls);
-
time is divided in intervals, as opposed to continuous time;
-
there are random elements that affect its state transition;
-
there is more than one agent present, and one’s actions may interfere with the others' performance.
Time is divided in timesteps; during each timestep, the agent perceives the environment and reasons about what action it will perform. In each timestep, the following happens: . The kernel updates all agents' perception (visual and communication) and waits for the agents' commands. . The agents updates their world model and make their decisions, sending their commands to the kernel. . The kernel sends the agents' commands to the simulators. . The simulators process the agents' commands and send the changes suffered by the environment back to the kernel. . The kernel sends the environment changes to the viewers.
5.2. Entities
Several objects are represented in the simulator as depicted in Figure 2.
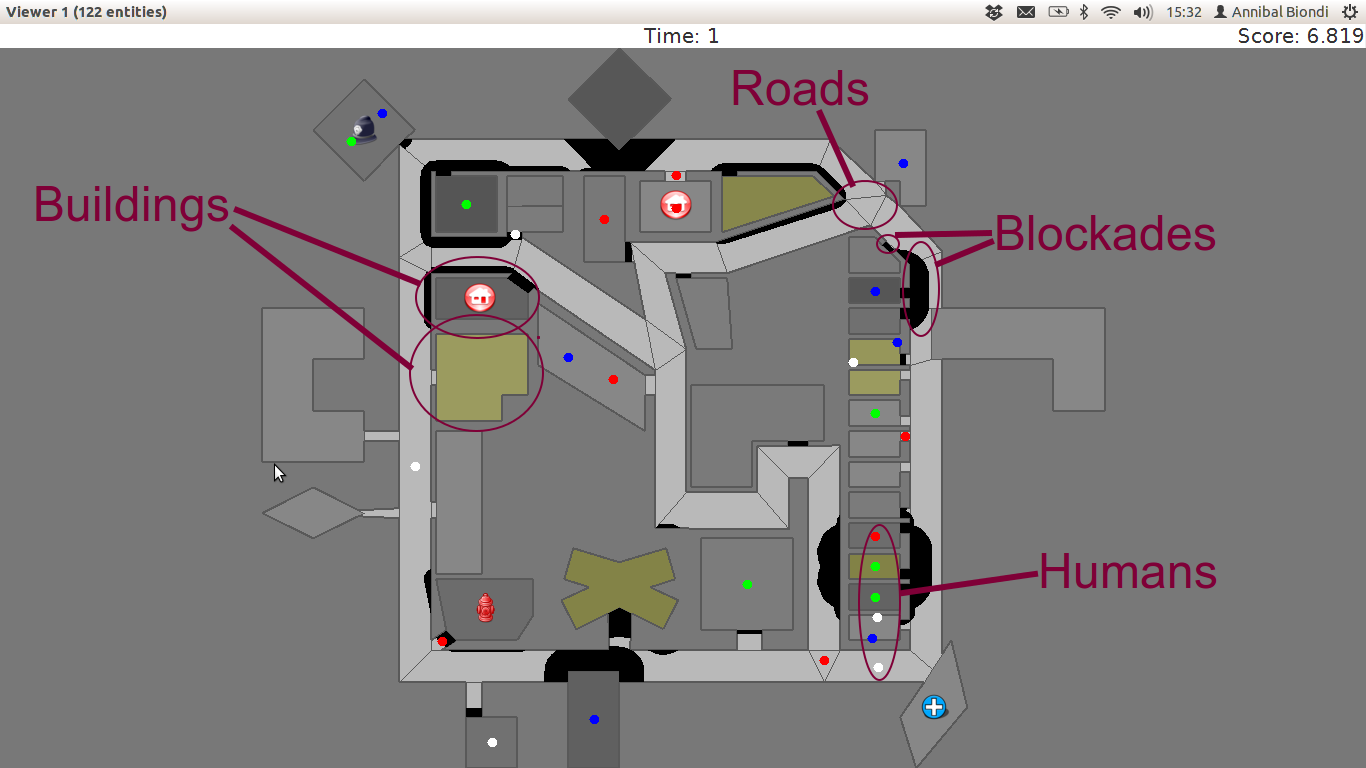
5.2.1. Blockades
Blockades obstruct the path of agents and civilians; they are represented as black polygons in roads. Blockades appear in the beginning of the simulation and are not produced after this. They must be removed by Police Forces.
The properties constituting a blockade are:
| position |
ID of the road to which the blockade belongs |
| repair cost |
cost to completely remove the blockade from the road |
| shape |
a rectangle which surrounds the whole blockade |
| X & Y |
coordinates of the blockade’s centroid |
| apexes |
vector containing the apexes of the blockade |
5.2.2. Area
Area entities represent buildings and roads.
The properties constituting an area are:
| blockades |
a list with the blockades in that area |
| edges |
a list with the edges that limit the area |
| neighbours |
a list of the areas that can be accessed from this area |
| X & Y |
coordinates representing the area in the map |
While both Buildings and Roads have the blockades attribute, blockades are valid only in Roads.
5.2.3. Buildings
Buildings represent all kinds of buildings in the simulator. There are special kinds of buildings like Refuges, Ambulance Centres, Fire Stations, and Police Offices that cannot catch on fire. Table 2 shows the illustration of these special buildings, they will be described in later sections of this document.
|
|
|
|


The properties constituting a building are:
| brokenness |
how structurally damaged the building is; does not change during the simulation |
| fieryness |
the intensity of the fire and fire-related damage in the building
|
| floors |
the number of floors the building has |
| ground area |
the area of each floor |
| ignition |
indicates if the simulator has lit this building on fire (NOTE: A building can catch on fire by being ignited by the simulator or by being close to a burning building; ignition will be set to "1" if the building was, at some point of the simulation, ignited by the simulator.) |
| importance |
unknown function; has equal values to all buildings |
| temperature |
temperature of the building; if it crosses a certain threshold, the building catches on fire |
| total area |
the total area of the building (floors x ground area) |
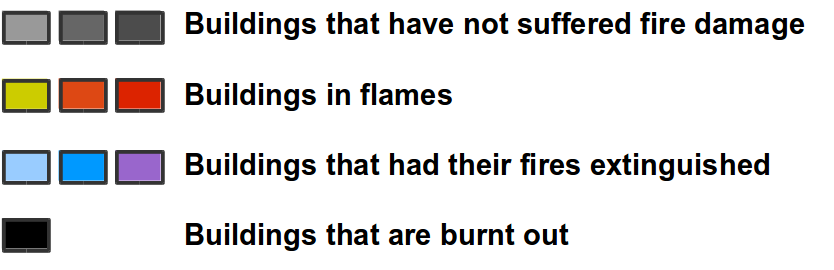
Regular buildings are represented as polygons of various colors, depending of their status, as shown in Figure 3; the darker the color, the greater the structural fire or water damage.
In the beginning of the simulation, broken buildings trap humans inside it under debris; these debris must be removed by Ambulance Teams, who then proceeds to rescue the human.
A Refuge is a special kind of building: it represents a place destined to support the rescue activity, providing medical care for the wounded and water to the Fire Brigades. In the simulator, humans inside a refuge have their damage zeroed, which means they do not lose health while they stay there; damage will, however, resume when the human entity leaves the refuge.
Also, Fire Brigades have their water supply replenished by a certain amount during each cycle while they are inside the refuge.
5.2.4. Roads
Area entities representing roads have no new attributes besides those of Area entities.
5.2.5. Humans
These are the entities representing humans. In the simulator, they can be Civilians, Ambulance Teams, Fire Brigades, or Police Forces. They are all represented by circles of different colors, and cannot move by themselves if they are dead or buried.
The properties constituting a human are:
| buriedness |
how deep the human is buried |
| damage |
how much HP the human loses per cycle; zeroes when a refuge is reached |
| direction |
direction to where the human is moving (inferred); the Y-axis positive half is zero, and the value increases until 129599 ((360 * 60 * 60) - 1) seconds anti-clockwise |
| HP |
health points of the human; if it reaches 0, the human dies |
| position |
ID of the entity where the human is; may be an Area entity or a human entity (if it is inside an ambulance) |
| position history |
a list of the entities the human has passed during the last cycle, in chronological order |
| stamina |
not implemented; would decrease each time the agent took an action and would be partially replenished at the beginning of each cycle |
| travel distance |
(unknown) |
| X & Y |
coordinates representing the human in the map |
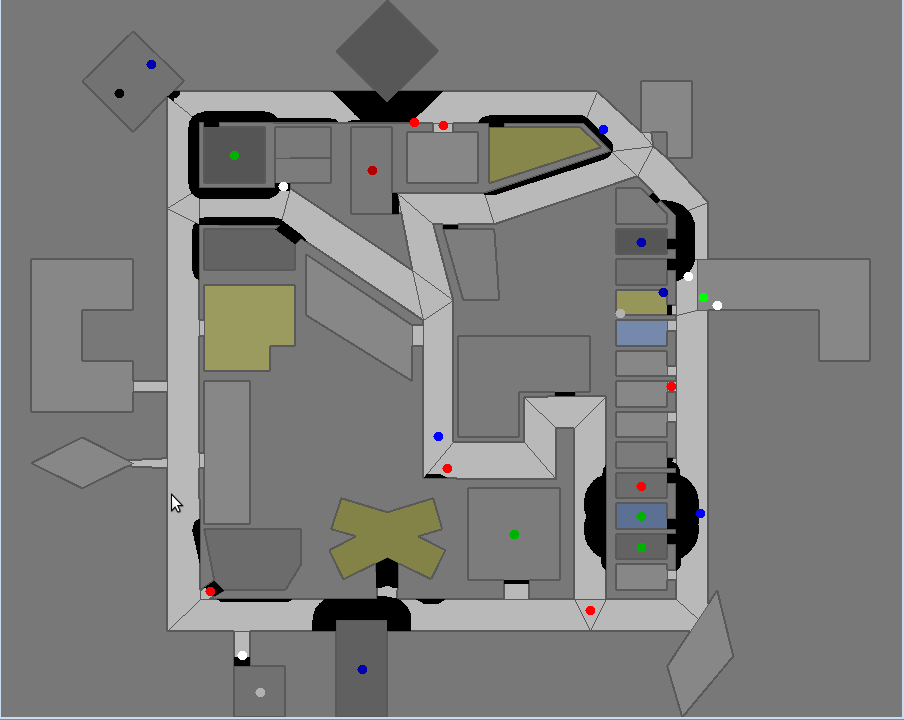
The color of each human in the simulator is defined by its type and its health: the lower its health, the darker it is. Dead humans are represented by the black color.
5.2.6. Civilians
Civilians are human entities and they are not part of a rescue team; they are represented by the color green. Their standard behavior is to walk to the closest refuge on their on if they are not wounded or buried; otherwise, they will have to be transported by an Ambulance Team.
5.3. Agents
These are the entities that will compose your rescue team; in other words, this is what you will program. Agents are divided in two types: Platoon Agents (Section 5.3.1) and Centre Agents (Section 5.3.2).
5.3.1. Platoon agents
Platoon agents are able to interact with the simulated environment through perception and executing actions on it. They can also exchange messages with other agents by vocal or radio communication. They are comprised of three different categories: the Ambulance Team, Fire Brigade, and Police Force.
| Ambulance Team |
is responsible for transporting rescued victims to a refuge. |
| Fire Brigade |
is responsible for unburying (i.e., rescuing) victims and extinguishing fires on buildings. They carry a certain amount of water in their tanks and they can replenish it in a refuge. |
| Police Force |
is responsible for removing blockades from the roads. When ordered to do so, they will clean a certain amount, specified in the repair cost parameter, from the target blockade at each cycle. However, differently from Ambulance Teams and Fire Brigades, having two Police Forces acting on the same blockade brings no advantage to the process: it will be as though there was only one Police Force acting on it. |
5.3.2. Centre Agents
Centre agents are a type of agents whose only interaction with the world is through radio communication. There are three types of central agents: Ambulance Centres, Fire Stations and Police Offices, and they are represented as buildings.
5.4. Perception and Commands
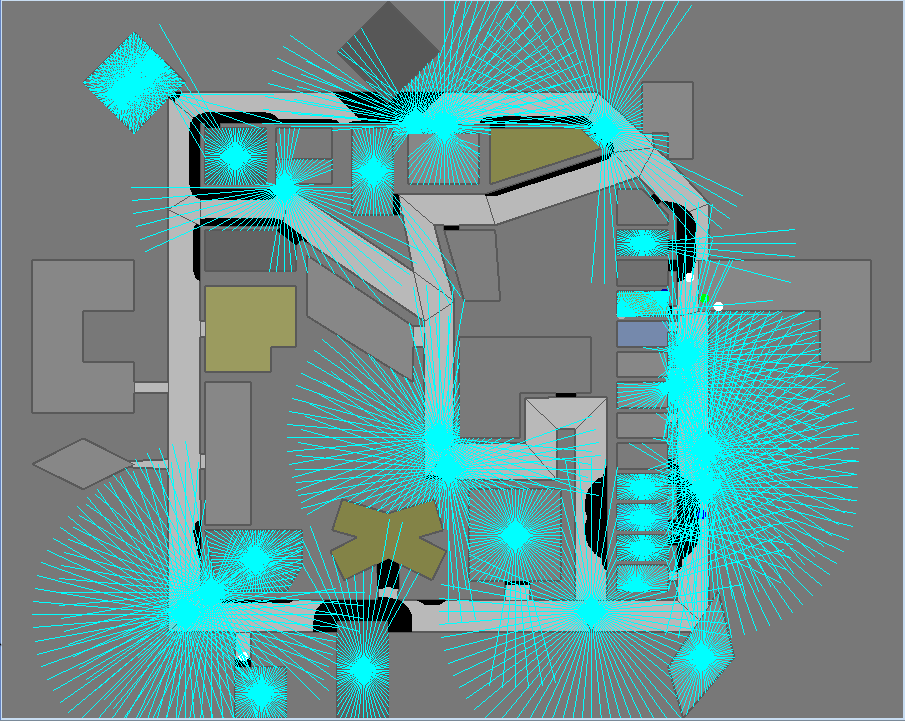
The simulator has two perception modes: standard and line of sight.
The line of sight perception simulates visual perception of the agent: a vision range and a number of rays are defined and the agent percepts anything that is reached by these rays.
The set of currently visible entities for an agent is stored in a structure named ChangeSet; entities present in it are automatically updated in its world model; that is, if an agent perceives a blockade it did not know that was there before, this blockade is automatically added to its world model. The opposite, though does not happen: if the agent does not perceive a blockade any more, nothing in its world model changes, even if it knew that there was a blockade there before. In that case, the agent will still think that there is a blockade in that road, even though such blockade has already been cleared. Thus, it is up to the agent to figure this out and modify its world model accordingly.
5.5. Communication
There are two forms of communication available in the simulator: direct communication and radio communication. Direct communication, done with the command speak, is communication audible to humans within a radius from the emitter agent, as if the emitter shouted something.
Radio communication is done with the command tell, and transmits information to all agents that are signed up to the channel on which it was broadcasted. Radio communication channels are present in limited number, each one with a limited bandwidth.
In both types of communication, the message has to be coded into a string of bytes before being sent; the receptor must decode it once it receives the message. Both types might be susceptible to message drop out, where the message is not received by its targets; radio communication is also susceptible to message failure, where the message is received empty.