1. Purpose
The RoboCup Rescue Simulator comes with some example maps that can be used to test and analyze a team of agents' performance. Although useful, these different maps do not represent all possible situations to evaluate a strategy or overall performance of a team of agents. Furthermore, teams would benefit to assess their performance in a larger number and variate of maps. Hence, it is useful to be able to create new maps for the RoboCup Rescue Simulator.
This tutorial describes the procedure to create maps and scenarios compatible with the RoboCup Rescue Simulator. The tutorial illustrates the basic steps to create a map and scenario using the creation of the map of the University of São Paulo, Brazil as example.
2. Tools
2.1. OpenStreetMap
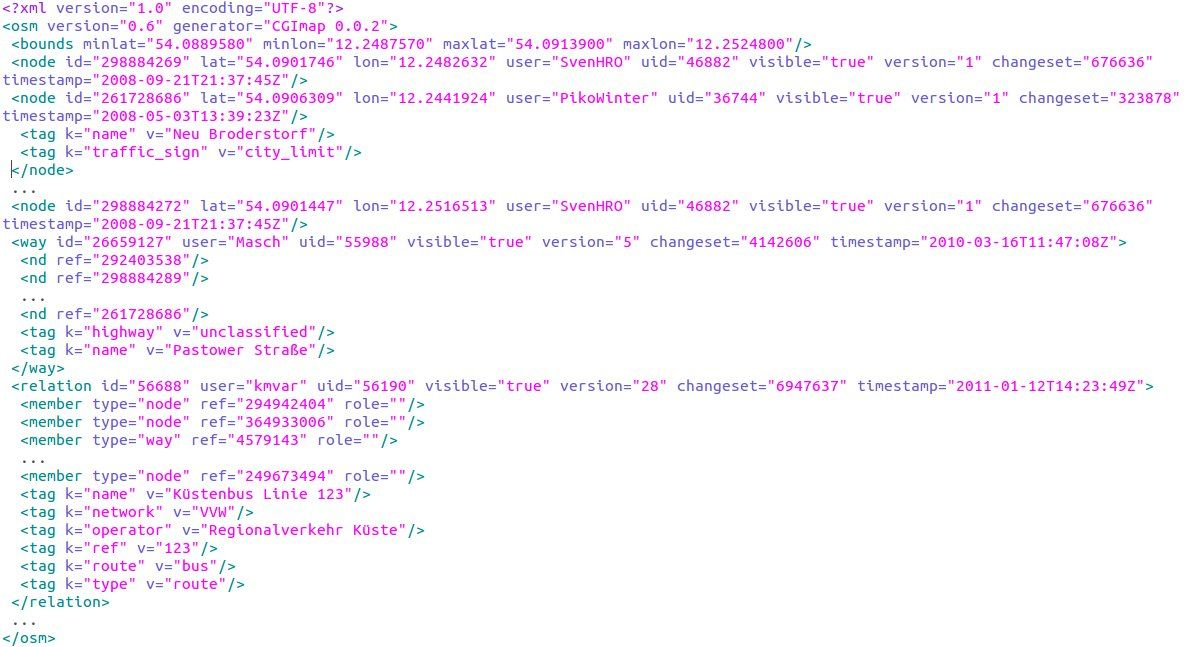
OpenStreetMap (OSM) is a free worldwide map web platform developed collaboratively. OpenStreetMap provides free to use geographic information from many places around the world. It was created under the project Planet OSM aimed to provide geographic information in XML format, containing description of Nodes, Ways, and Relations. A new version of the project is released every week in a single XML file (around 93GB compressed at September 5, 2020). The entire map, or the latest weekly changeset, can be downloaded at https://planet.openstreetmap.org/. Figure 1 shows the layout of a reduced .osm file.
2.2. Geographic Markup Language
Geographic Markup Language (GML) is a XML-based grammar used to describe interchangeable geographic information. It was defined by the Open Geospatial Consortium, and it is largely used for providing a rich set of markup primitives that allow the creation of application specific schemas, such as the definition of Buildings and Roads. The RoboCup Rescue Simulator uses the GML format for representing the entities in its maps.
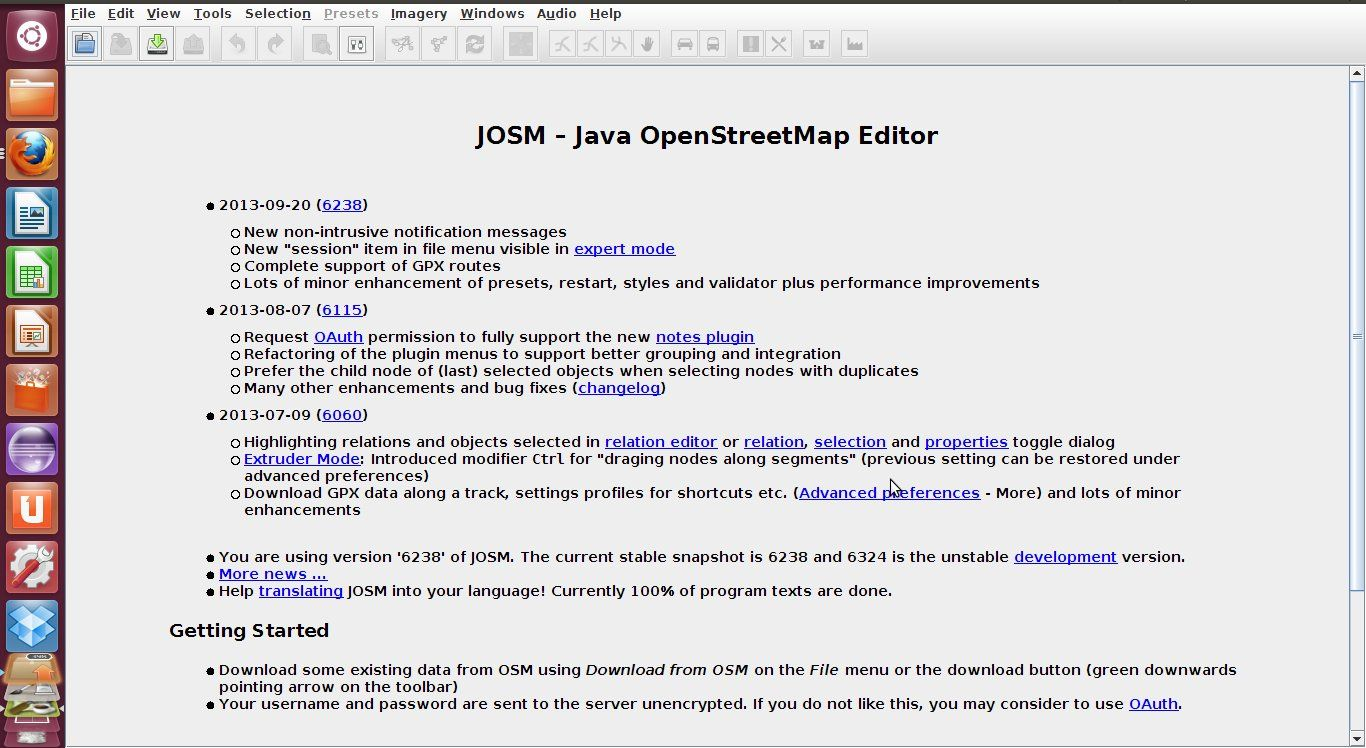
2.3. Java OpenStreetMap editor
Java OpenStreetMap Editor (JOSM) is an open Java-based OpenStreetMap editor, an application originally developed by Immanuel Scholz and currently maintained by Dirk Stocker. JOSM can be used to download, edit, and convert maps from OSM to the GML format. The conversion requires a plugin that can be downloaded at RCR-converter.
2.4. osm2gml
The osm2gml enables the conversion from OSM to GML standard, transforming the XML file from one format to the other. The conversion process changes the features in the original map to make it compatible with the GML representation of the maps in the RoboCup Rescue Simulator. The osm2gml is part of the RoboCup Rescue Server project (see README at RoboCup Rescue Server).
3. Map and scenario creation process
In a nutshell, the process of creating a map for the RoboCup Rescue Simulator is comprised of 3 basic steps:
-
Capture the map in a OSM file format (
.osmextension)
The JOSM editor is used to browse through the OSM worldwide map, select the wanted area of the map, and export the map area information as an.osmfile. Section 3.1 illustrates in detail how to perform these tasks. -
Convert the OSM file into the GML file format
Theosm2gmltool is used to convert the OSM file into a GML file format. If the conversion fails, perform the map capture again using the JOSM. Section 3.2 illustrates in detail how to use theosm2gmltool and some recurrent changes that must be made on the OSM map before converting it. -
Create a valid RoboCup Rescue scenario for the map on the simulator
To use the map on the RoboCup Rescue Simulator, a scenario has to be created setting the initial position of agents, special buildings like Ambulance Center, Fire Brigade, Police Station, and Refuges. Section 3.3 illustrates in detail how to setup a scenario associated to a specific map.
3.1. Map capturing
The map capturing is performed using the JOSM tool and it is comprised of another 3 stages: install and run the JOSM tool Section 3.1.1, select and download locally a region of the map Section 3.1.2, and save it as an .osm file Section 3.1.3.
3.1.1. Download and run JOSM
First, download the JOSM tool from the https://josm.openstreetmap.de/. There are multiple alternatives to download JOSM, i.e., Installer, Launcher, JAR file. The recommended alternative is the JAR file, which is compatible with any environment supporting Java 8+. Once downloaded, execute the JAR file as
$ java -jar josm-tested.jarFigure 2 illustrates the JOSM editor interface.
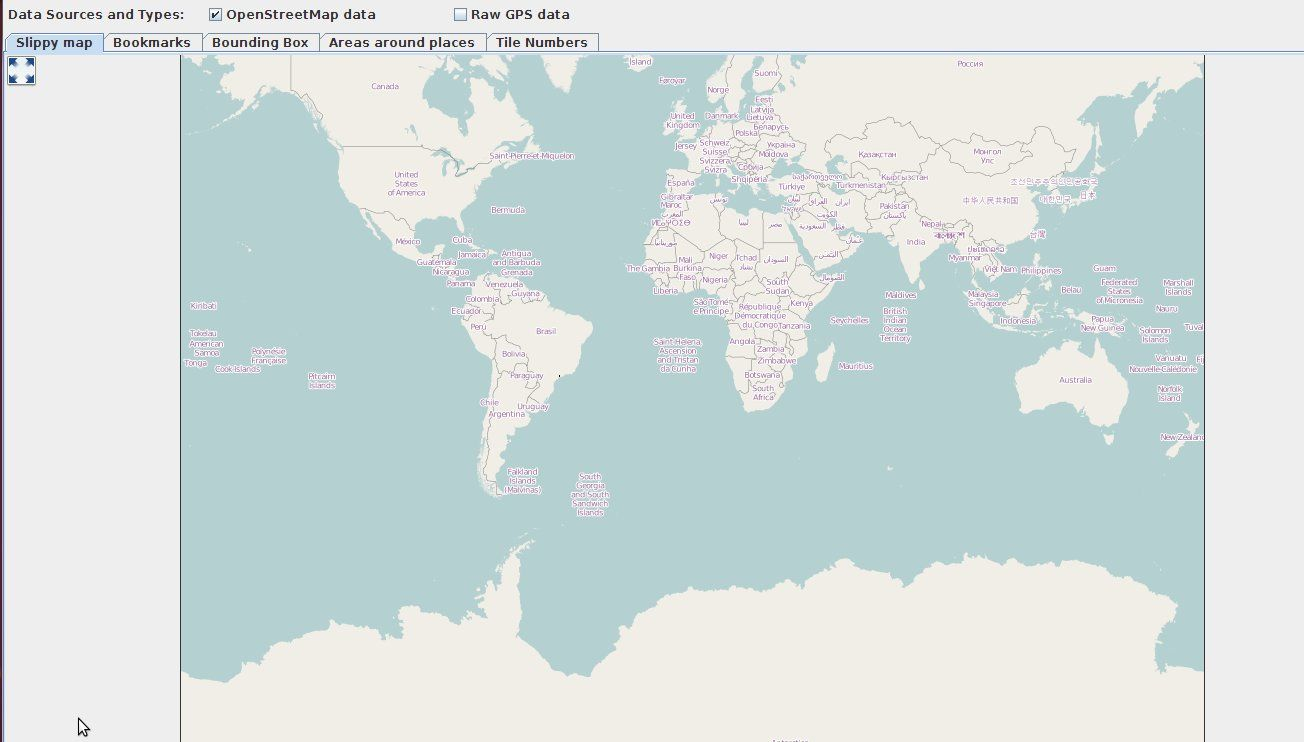
3.1.2. Select and download the region of the map
On the toolbar, select the green arrow button to "Download Map from OSM Server" and a zoomed out map is shown (see Figure 3).
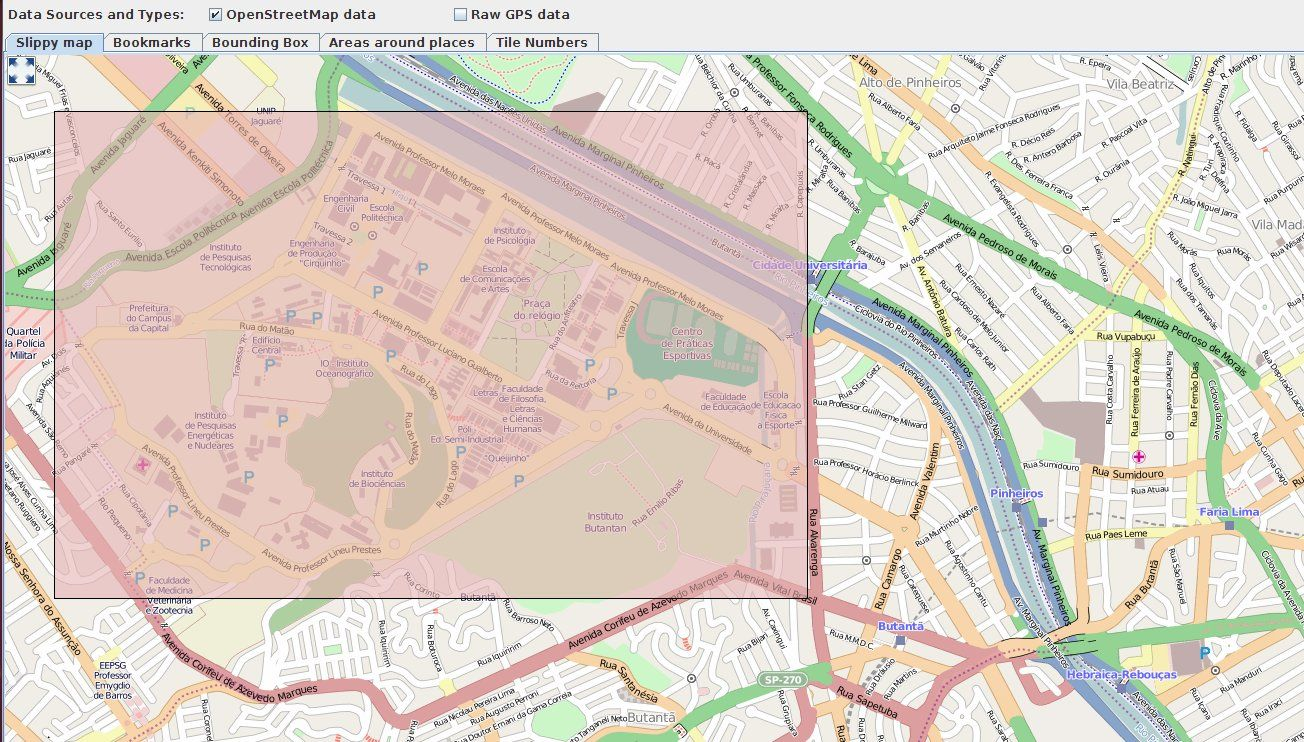
Manually zoom in until the region of interest is found. After finding the region of interest, select the specific area you want to download, and select the Download button to download the selected region. Figure 4 shows the selected area corresponding to the University of São Paulo.
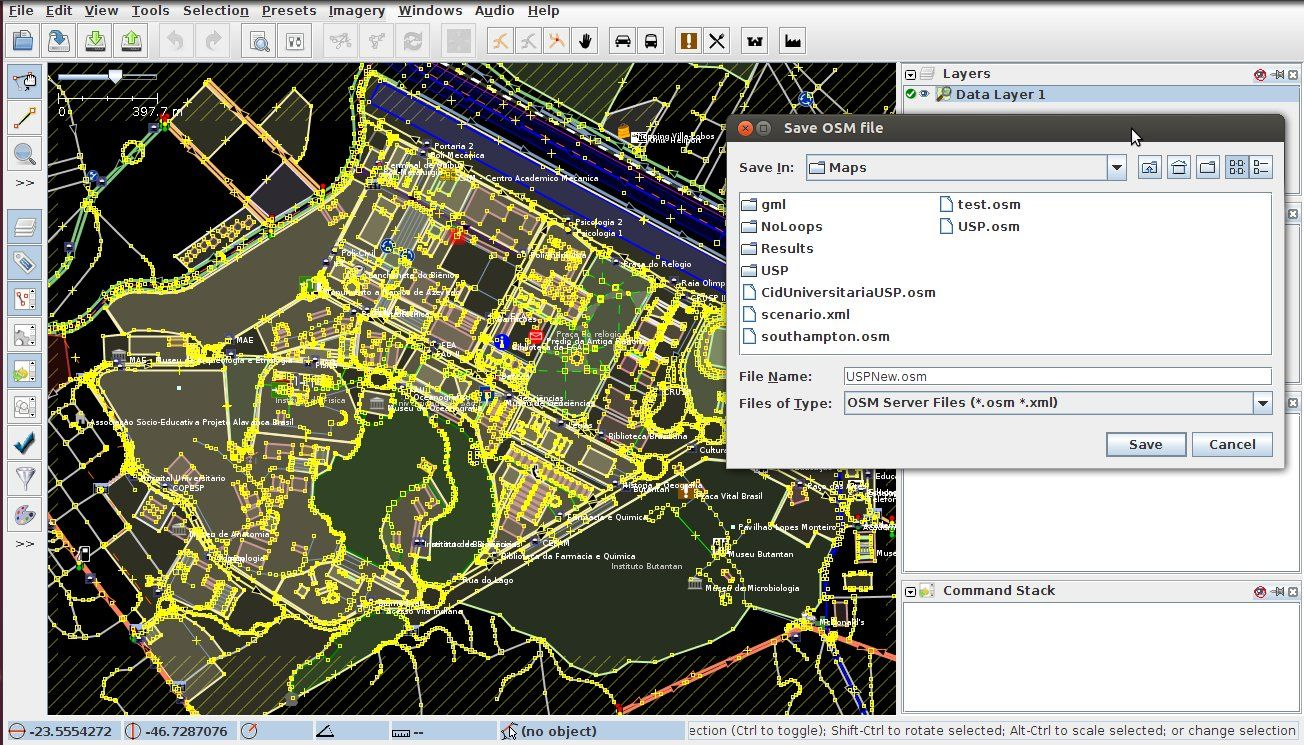
3.1.3. Save the OSM file
After downloading the area of the map from the OpenStreetMap server, JOSM will open the edit screen with the downloaded map on display. Before starting editing it, save the map using the File -> Save As.. menu options (see Figure 5).
3.2. Convert OSM map into GML map format
After saving the map in OSM format, there is the need to convert it into the GML format compatible with the RoboCup Rescue Simulator using the osm2gml tool. The OSM map, however, normally contains some kinds of shapes and streets that causes the conversion to fail, and some buildings and streets not marked as such, which makes them disappear in the conversion process. Section 3.2.1 describe some of these problems and how to overcome them.
3.2.1. Adjusting the OSM map
In order to make the map convertible to the GML format, some changes have to be made on the original OSM map.
|
Note
|
The problems reported here are not exhaustive, but purely based on experience during the creation of the University of São Paulo map. Some of these problems may not show up in other map conversions and new problems may arise. |
3.2.1.1. Buildings
-
Remove Buildings from outermost shapes
Some of the buildings overlap with the outermost shape in the map. The converter interprets all buildings overlapping with the outermost shape as only one, the outermost one, eliminating all buildings. To prevent this situation, it is necessary to remove the outermost shape, allowing the buildings to be processed separately. In order to remove the outermost shape, click in one of its edges, then press Delete. Figure 6 illustrates the case of multiple buildings inside another shape.
-
Making Buildings as Building
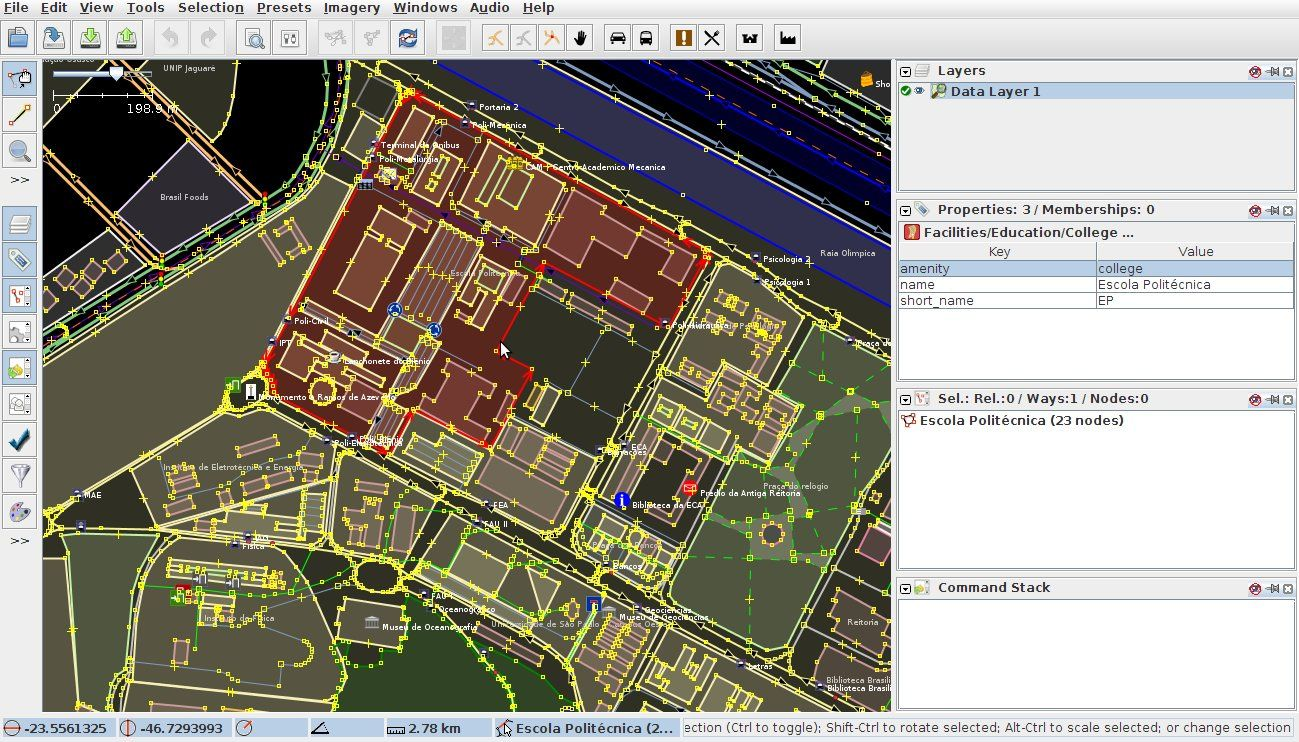
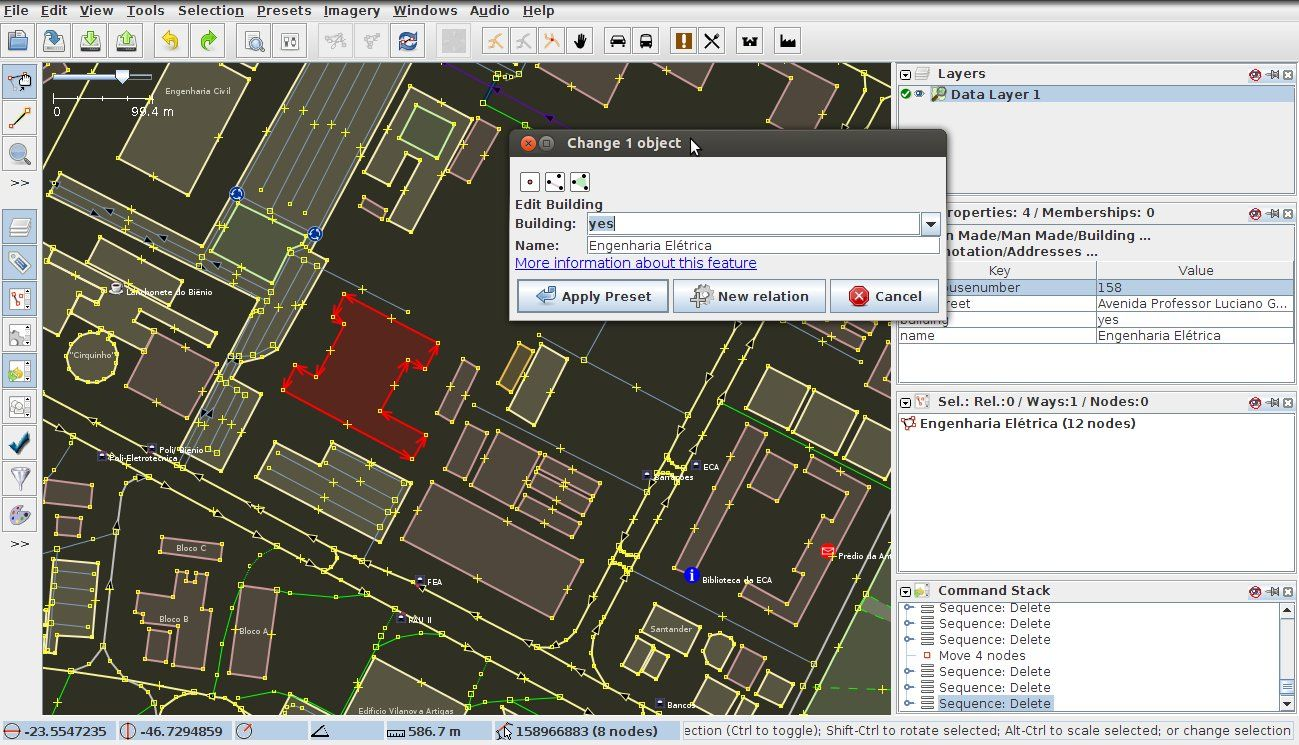
Because most of the times shapes corresponding to Buildings in the original OSM map are not marked as buildings, the converter does not generate a corresponding building at the resulting GML map. Hence, it is necessary to identify manually all the non-marked buildings in the OSM map. To set one shape as Building, select the shape then go to Presets -> Man Made -> Man Made -> Building menu option. Then, select one of the Building type. Figure 7 shows the setup of a shape as building.
-
Separate Overlapping Buildings
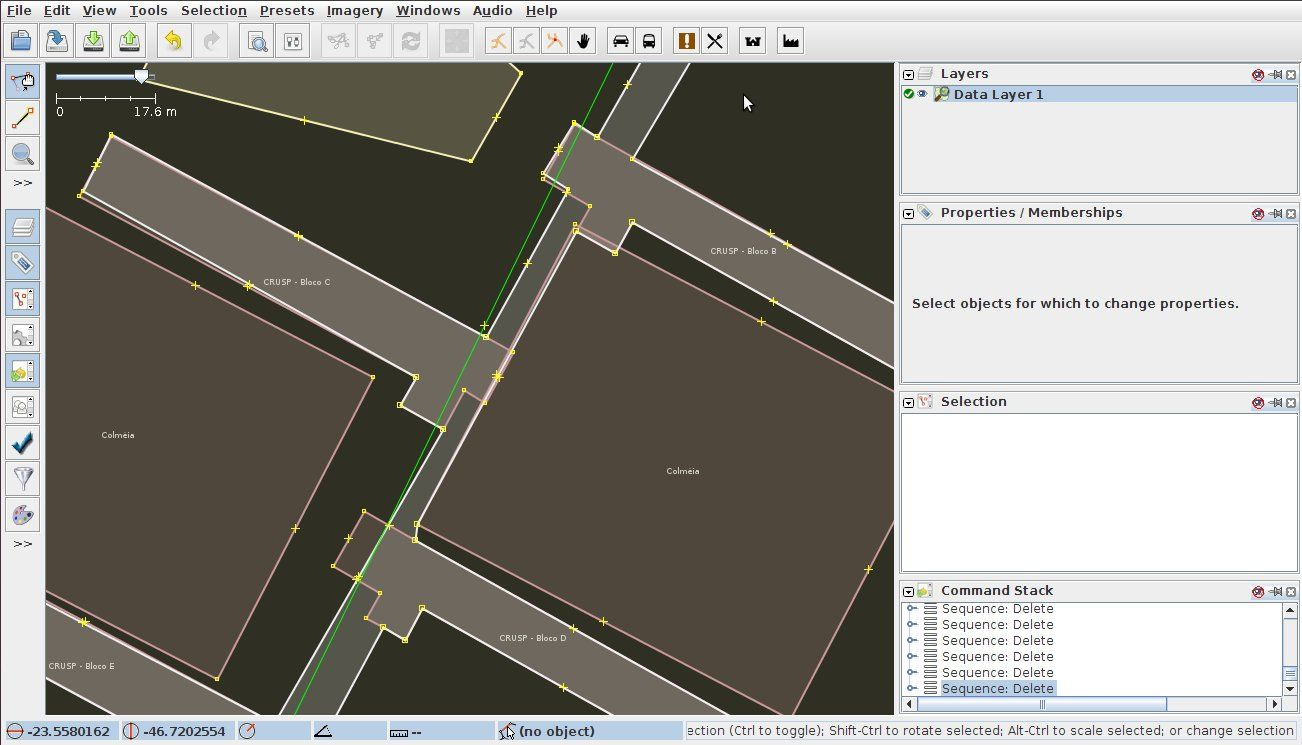
The original map may contain shapes that overlap each other, either two buildings, or one building and a road, or two roads. The converter processes these overlapping during the conversion process, but sometimes it fails. The safest practice is to separate the overlapping shapes in your map before converting it. Select one of the shapes and drag and drop it to separate one from the other. Figure 8 illustrates an example of overlapping buildings.
3.2.1.2. Roads
-
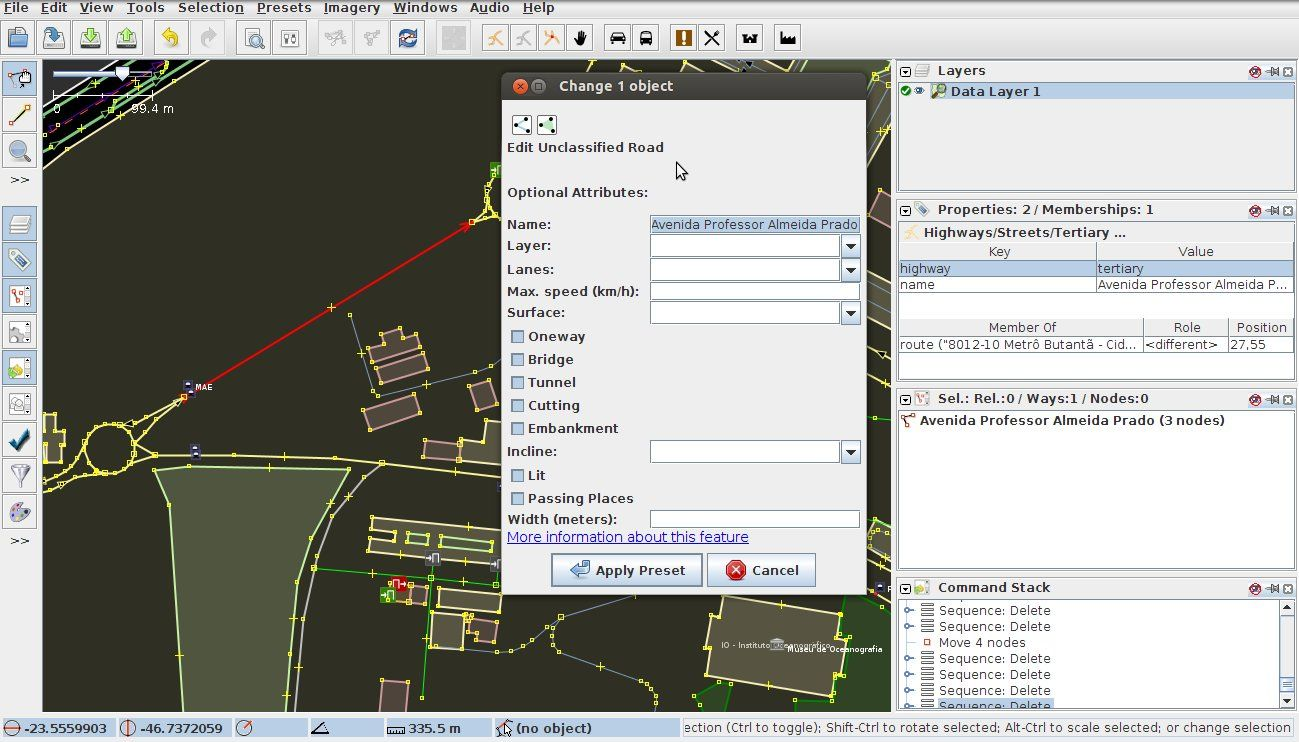
Setup roads as both ways
Most roads on the original map are set as only one way road, although some of them should be both ways roads (see Figure 9).
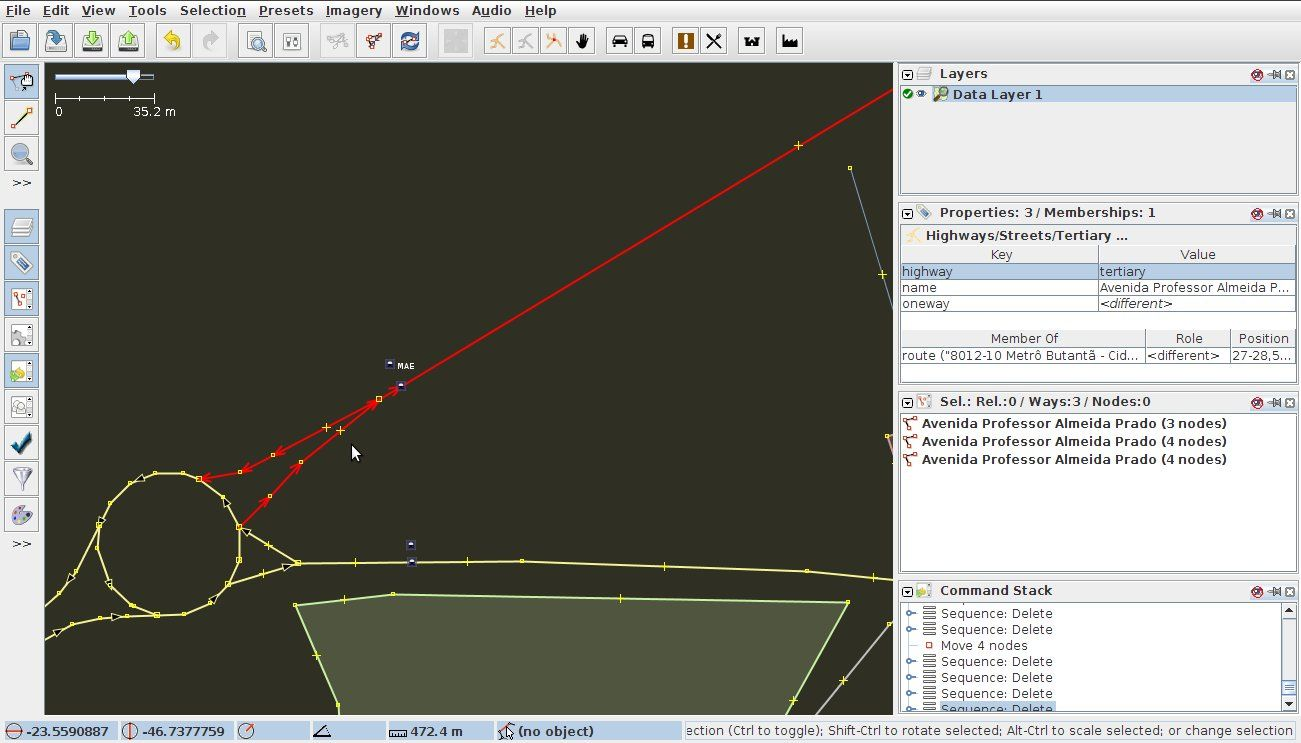
To set roads as both ways, select it then go to Presets -> Highways → Streets and select the street type. A dialog will appear, before clicking OK, make sure the checkbox Oneway is not selected. Figure 10 illustrates the dialog for the option of "Unclassified" street.
-
Remove roads from inside buildings
The original OSM map may have some lines inside the buildings, which represent the path one can walk inside them. But sometimes these lines are interpreted by the converter as roads, and this can cause the conversion process to fail. To prevent this problem, it is necessary to remove these lines from inside the buildings. Figure 11 shows an example of lines inside a building.
3.2.2. Running the map converter
To convert the adjusted OSM map into the GML format, it is necessary to run the osm2gml converter. The run the converter, open a terminal window, navigate to the rcrs-server root directory and execute
$ ./gradlew osm2gml --args='<osm map path> <gml map path>'The <osm map path> is the path to the OSM map file and the <gml map path> is the destination GML map path.
|
Note
|
Even after running all the checks in Section 3.2.1, there still may be some invalid entities in the map may cause the conversion to fail. Use the JOSM to fix those newly identified error in an iterative process. |
Figure 12 illustrates the converter application running, and Figure 13 shows the resulting map after the conversion.

osm2gml Running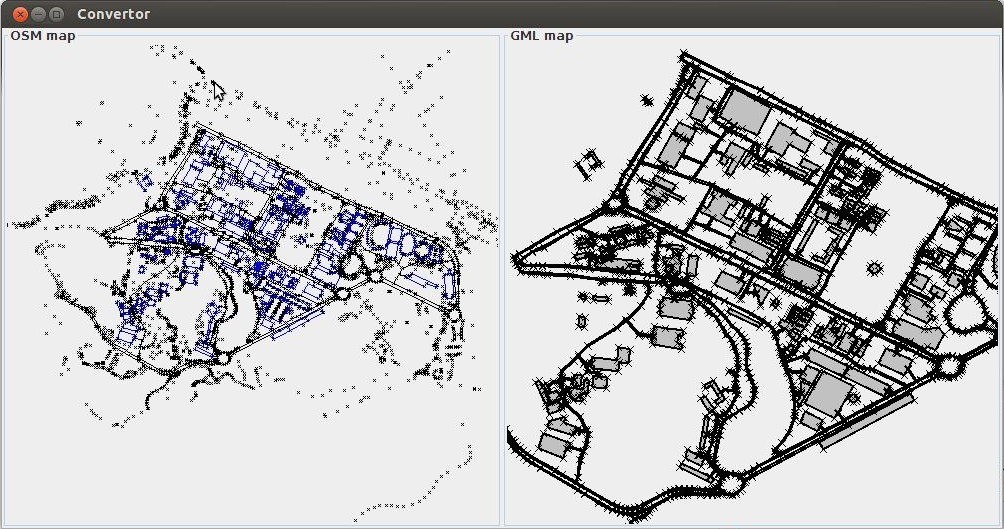
3.3. Create a Scenario
Create a scenario means configuring the initial state of the entities in a map such as the initial location of agents, the locations of the centre agents, buildings on fire, etc.
To illustrate the creation of a scenario, the University of São Paulo created in Section 3 is used.
3.3.1. Map directory
The maps and scenarios of the current maps in the RoboCup Rescue Simulator ae stored in the directory rcrs-server/maps/. Inside each folder in this directory there are a map.gml and a scenario.xml file. The former represents the map in GML format, while the latter represents one scenario for that specific map.
3.3.2. GML map file layout
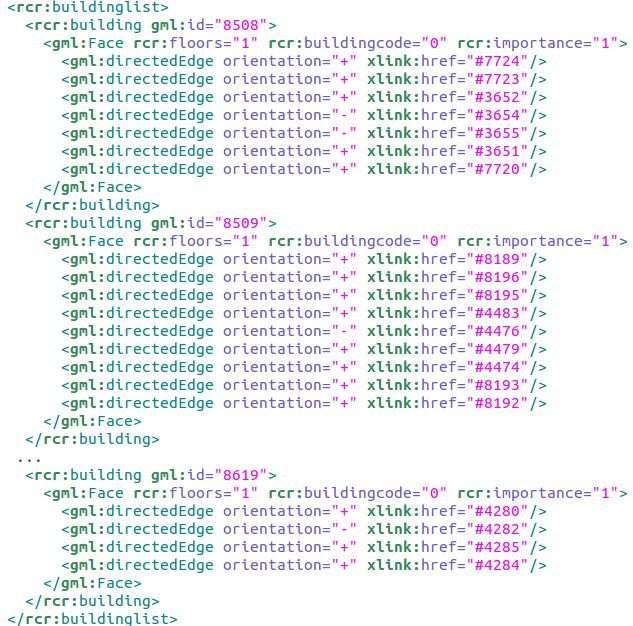
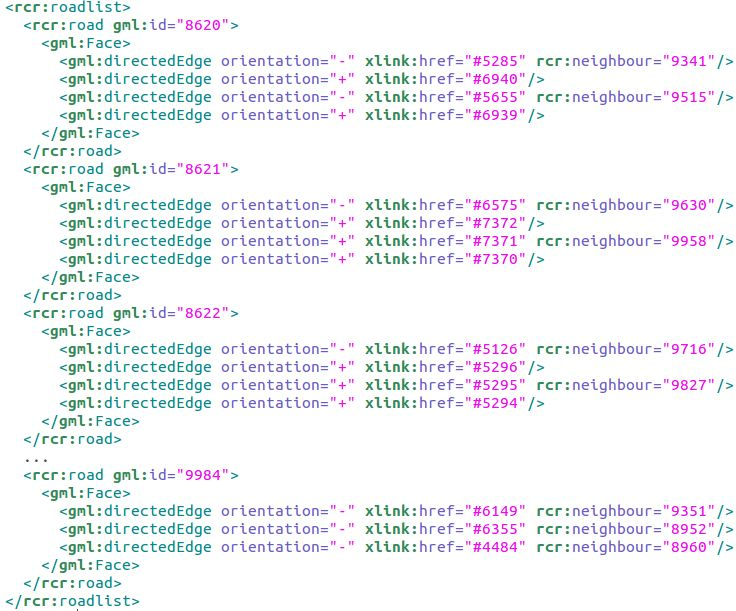
In order to create a scenario, it is necessary to understand the layout of the GML file. The GML file is separated into 4 important parts: the node list, the edge list, the building list, and the road list.
The edge list contains information of all the edges that are composed by the nodes in the node list. The buildings and roads are defined based on the edges. Figure 14 and Figure 15 show a example of the building and road lists on a GML map file.
3.3.3. Creating a scenario
The scenario file is also XML formatted file, and contains a list of the entities that compose the simulation initial state, including the starting fires, refuges, civilians, agents, etc. Each element of the xml file has two attributes. The first determines the type of entity being created (fire, refuge,
ambulance, ambulance centre, etc.) and the second determines where the location of the entity in the map at the beginning of the simulation. The location is a number that refers to the id of an entity in the GML file (either a Building or a Road).
There are two tools that can assist in creating a scenario: Scenario Editor and Random Scenario. Please refer the RoboCup Rescue Simulator Manual for information of how to run these tools.
Figure 16 shows a reduced representation of scenario file created for University of São Paulo map.
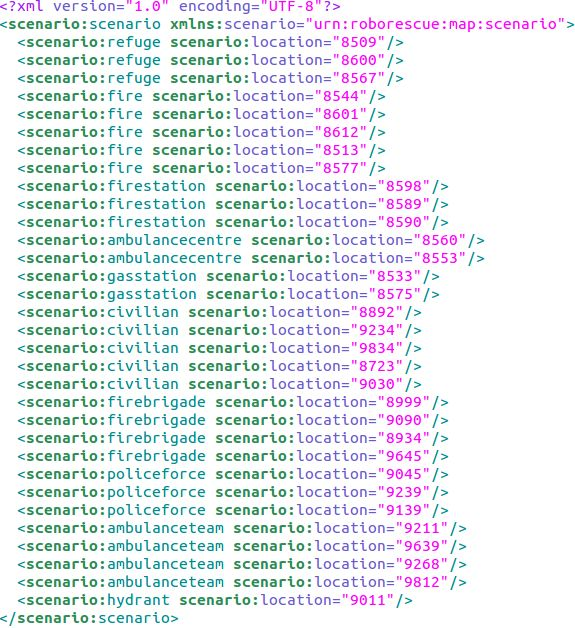
Some types of entities can be located only on Buildings, others only on Roads, and other yet in both. The following list shows the types of entities and where they can be located at.
-
Building
-
fire
-
refuge
-
firestation
-
ambulancecentre
-
policeoffice
-
gasstation
-
ambulanceteam
-
policeforce
-
firebrigade
-
civilian
-
-
Road
-
hydrant
-
ambulanceteam
-
policeforce
-
firebrigade
-
civilian
-